Thursday, December 11, 2008

warming winter granola

ah yes, the weather is certainly beginning to look frightful.  the other night upon returning home from work there was actually snow blanketing all the cars, and it was cold enough to have stuck through to morning!  with this cold weather we’re left craving heartier foods - warmer and a bit fattier - our instincts kicking in to keep us warm through the cold season.  winter at my house comes with batch after batch of homemade granola – some for us to nibble on, the rest put in large mason jars and given away as holiday gifts.  it’s extremely easy to make, there are endless ways to play with the ingredients, and it tastes infinitely better than any store-bought brand you can find.  this particular recipe (please, play with it according to your own tastes) is based on my brother Josh’s delicious granola – the candied ginger is the not-so-secret-anymore ingredient and gives it the perfect kick.

as with anything, the more processed oats are the less nutrients they offer.  rolled oats are not as nutritious as whole or steel-cut oats, but still retain more nutrients than other refined wheat products, and certainly more than instant oatmeal.  oats are a natural choice during the winter, probably because – as stated in Rebecca Woods’ “The New Whole Foods Encyclopedia” – they “impart stamina and warmth” as well as “improve resistance to stress and thus support the system being in a healthy state of balance.”  they also help to soothe the nervous system and stabilize blood sugar. 

flax seeds, which I also love to sprinkle over salads, are the highest source of omega 3 fatty acids, but this can only be taken in if they’re thoroughly ground up, and is killed off altogether in cooking.  grind them up and then sprinkle them over your granola, or simply use them whole (as the recipe states) and use your natural grinders – your teeth….chew well to release the fatty acids.  flax seeds also offer antibacterial and anticancer properties, and help promote digestion.

enjoy your warming winter granola and go have some fun in the snow!


Warming Winter Granola

3 cups rolled oats

1 cup mixed nuts, chopped well (pistachios, cashews, almonds & walnuts all work well)

¼ cup sunflower seeds
¼ cup pumpkin seeds

1 tablespoon wheat germ
1 tablespoon cinnamon
1 teaspoon sea salt

½ cup maple syrup
¼ cup canola oil

2 tablespoons raw honey

2 teaspoons pure vanilla extract

½ cup candied ginger, minced
3 tablespoons flax seeds

½ cup coconut flakes, unsweetened

1 ½ cups mixed dried fruit, chopped (I used dried strawberries and cranberries here)

  1. Preheat oven to 350.  In a large bowl combine oats with nuts, seeds, wheat germ, cinnamon and salt.  Set aside.
  2. In a small saucepan, warm canola oil on low heat.  Once warm add maple syrup and whisk to incorporate.  Remove from heat and add honey and vanilla extract.  Pour over oat mixture and immediately stir well, coating all of the oat mixture.  (At this point taste your granola and make any seasoning additions you think necessary.  If you don’t like the taste now you might not like it when it’s done!)
  3. Spread evenly onto rimmed baking sheet.  Bake for 25-30 minutes, stirring once or twice so as not to burn around the edges.  Remove from oven once golden.
  4. Allow to cool completely, then mix in remaining ingredients.  Enjoy with yogurt, milk, or on its own!


Saturday, November 22, 2008

For Your Thanksgiving Feast: Fresh Pumpkin Cheesecake & Roasted Fall Vegetables

alright folks, this is the time to get down and dirty in the kitchen.  dishes piling up in the sink and on the counter, one of the many courses baking, broiling, roasting and simmering.  the near-palpable smells of Thanksgiving filling the hallways throughout the house – onions, carrots, sage, pumpkin, sweet cranberries – and maybe some unfamiliar ones as new favorites are added to the annual feast. 

thanksgiving is one of my favorite holidays – I look forward to it for months, thinking about my favorite pistachio-mint-pomegranate stuffing, the big turkey, the many sides from which to chose.  this is a particularly special thanksgiving for me because it’s my first one as a chef – or at least a line cook – so my head is buzzing with menus showing off this years' autumnal bounty!  my goal this year: to make my pumpkin pie from fresh pumpkins, and instead of a pie to try a pumpkin cheesecake.  use the recipe below to satisfy everyone’s sweet tooth & mandatory pumpkin flavored dessert, but with twist.  (this recipe does not take as much time as it seems at first glance.  it’s fun to work with the real food rather than a can, and your guests will think you’re a true culinarian..try it out!)

and if you haven’t been to the farmer’s market yet, get down there and check out all the fall/early winter foods overflowing at each stand.  pick up some fresh vegetables to roast for your thanksgiving table – the ones in the recipe below are my suggestions but you can pick your own.  but definitely try out the Jerusalem artichoke – you will be happy you did!


*If you don’t have a Cuisinart to crush the graham crackers for the cheesecake, simply place them in a clean kitchen towel and roll over them with a rolling pin.

Fresh Pumpkin Cheesecake

 Crust:

2 cups crumbled graham crackers or butter biscuits

¼ cup turbinado (raw cane sugar, or light brown sugar)

½ cup unsalted butter, melted

Filling:

1 small sugar pumpkin, enough to yield 1 ½ cups of flesh after draining

3 packages cream cheese

3 large eggs

¼  cup packed light brown sugar

½ cup sugar

1 ½ teaspoons cinnamon

½ teaspoon freshly grated nutmeg           

½ teaspoon ground ginger

1 teaspoon cardamom

½ teaspoon lemon zest

½ teaspoon salt

1 teaspoon vanilla

¼ cup heavy cream


cheesecloth


For Pumpkin Puree:

1.              Clean the outside of the pumpkin with water. 

2.              Using a large serrated knife, cut pumpkin in half lengthwise and pull out all of the seeds (I like to save them for roasting).  Scoop out the dangly innards and throw away.  Cut each piece in half again, lengthwise.

3.              Using either a double steamer or a steamer basket with a large pot, fill with water until just above the steam holes.  Bring to a boil and add pumpkin, turning heat down to simmer. 

4.              Steam pumpkin for 30 minutes or until thoroughly soft – make sure to check that your water doesn’t completely evaporate and add more as needed, each time bringing back up to a boil and then down to a simmer. 

5.              Once pumpkin is done, remove from pot and place on cutting board. Scoop out the flesh and place in a bowl.  Using a hand/immersion blender, a regular blender, or hand mixer, blend pumpkin until completely pureed.

6.              Place a large piece of cheesecloth in a colander in the sink,transfer pureed pumpkin 

to cheesecloth. Bring all of the ends of the cheesecloth together and squeeze out excess moisture from the pumpkin.  Keeping the ends of the cheesecloth twisted so no puree leaks out, place something heavy over the puree (like a pot) and allow to drain for at least 20 minutes. 

For Crust & Filling:

1.  Preheat oven to 350°F. Mix graham cracker crumbs, sugar and butter until a crumb mixture forms, then press onto the bottom of a 9” – 9.5” springform pan.  Bake crust until golden, 8 - 10 minutes, and allow crust to cool.

2.  Beat cream cheese until smooth in a KitchenAid mixer or with a hand mixer.  Add sugars and mix well.  Add eggs one at a time.  Add pumpkin, seasonings, vanilla, and cream, and beat on medium speed to quickly incorporate all ingredients. 

3.  Pour filling over cooled crust.  Bake at 350° for 50-60 minutes.  The cake is done when you shake it and it stays mostly still but the middle still wobbles a bit.  Allow to cool completely.

4.  Refrigerate for several hours or overnight to allow flavors to develop.


* * * *


Roasted Fall Vegetables


2 medium Jerusalem artichokes/sunchokes

10 small potatoes

6-8 small carrots, greens attached

1 sweet potato

2 cups brussel sprouts

2 tablespoons EVOO + ½ tablespoon EVOO

1 teaspoon salt + ½ teaspoon salt

3 large sprigs rosemary

Fresh cracked pepper

2 large cloves garlic, skin on

2 bay leaves

  1. Preheat oven to 400.  Oil a roasting pan and set aside.
  2. Clean all veggies well.  Slice Jerusalem artichokes into ½” rounds, and chop potatoes into small 1” pieces.  Cut all but 1” of greens from the carrots.  Peel & cut sweet potato into thick slices. 
  3. Mix all veggies except brussel sprouts.  Chop 1 sprig of rosemary leaves and sprinkle on veggies.  Add 2 tablespoons olive oil, 1 teaspoon salt & pepper and mix well.  Spread out on oiled pan (saving the used bowl) - use 2 pans if necessary, so veggies are arranged in a single layer.  Add remaining sprigs of rosemary, bay leaves and garlic, and cover with aluminum foil.  Pierce several times with a fork.
  4. Bake for 20 minutes.  Meanwhile, cut off the very bottom of the brussel sprouts, then cut them in half.  Mix them in the bowl used for the other veggies, allowing them to be coated by the remaining oil & herbs.
  5. Remove foil and add the brussel sprouts.  Add remaining olive oil & salt (adding more if necessary) and bake for 20 minutes more. ***If you are cooking this as a side dish to meat, cook at the same time and add ½ cup of juices from the meat at this point.
  6. Turn oven to broiler and broil on high for 2-3 minutes until gently browned.
  7. Remove from oven and enjoy!


Friday, November 7, 2008

today at the farmers market I discovered a new leafy green.  semposi, which is like collard greens but a bit sweeter, is definitely my find of the week.  leafy greens are essential in our diets, offering a tremendous amount of chlorophyll, iron, calcium, and vitamins A & C.  they’re sweetest in the colder seasons after a nice frost, so this is the perfect time to get your leafy green party on.

I based my meal (recipe below) on what I found at the farmers market, plus a ltitle inspiration from my current work at Spice Market.  there’s nothing more delicious then sitting down to a homemade meal whose ingredients all come from local farms – you can literally taste the freshness.  the apples & pears came from Breezy Hill Orchard in Straatsburg, NY, and the Semposi & Sunflower shoots came from WindFall Farms in Montgomery, NY. 

this dressing is great with the Fall Salad below, but can also be used with raw lettuce salads or even as a sort of dipping sauce. 

Spicy Candied-Ginger Dressing

yields ¾ cup


¼ cup EVOO

4 teaspoons minced cayenne pepper

1/4 cup diced candied ginger

1 tablespoons brown rice vinegar

2 teaspoons mustard

2 teaspoons agave

1 teaspoon salt

¼ cup water

3 tsp lemon

2 scallions, chopped thin (whites only)

1.  Add all ingredients in a blender and blend well.  Chill before using to allow flavors to develop and dressing to thicken.


Fall Salad

serves 4 side portions


5 cups chiffonaded semposi

1 teaspoon EVOO

1 teaspoon salt

½ teaspoon black pepper

3 medium radishes

1 apple

1 pear

1/3 cup sunflower seeds

1/3 cup pumpkin seeds

¼ cup spicy candied-ginger dressing

sunflower shoots for garnish

1.  Chiffonade semposi by placing leaves one on top of the other & cutting out the spine. Roll width-wise into a log, and slice into 1/4” pieces.

2.  Bring a pot of water to a boil; once water is boiling heat a sauté pan on medium-high.  Blanch kale in boiling water for about 45 seconds, strain immediately.  Add 1 teaspoon olive oil to hot pan and add strained semposi. Saute on medium-high heat for about 5 minutes, mixing in salt and pepper.  Remove from heat and allow to cool.

3.  Julienne the apple & pear (cutting into long, thin strips) either on a mandolin or by hand.  Thinly slice radishes either length or width wise. 

4.  Combine apple slices, pear slices, radishes, both seeds & salad dressing and mix well (adding more dressing if desired).  Arrange semposi on a plate, top with apple & pear mixture, and add sprinkle sunflower sprouts on top.  Enjoy!


Monday, October 27, 2008

beet & carrot chips with sage crisps

the other day I spent my day off walking around the farmers market, sipping on warm apple cider (they had already run out of doughnuts…shame) and marveling at all the beautiful fall vegetables that adorned every stand. 

beets and carrots are still out in full swing, and I decided to grab a few of each to make a little homemade, healthy snack-food.  beets & carrots are wonderful because they’re both so naturally sweet, so they are a great choice for satiating a sweet craving.  beets help promote circulation, aid the liver, and help alleviate constipation.  carrots also promote elimination, as well as lowering blood sugar and acting as a tonic to the kidneys.  both carrots & beets help to purify the blood.

these beet & carrot chips are a great alternative to store bought chips – although they will not get nearly as crispy, they are still great!  they also have a nice autumny feel because of the sage, which turns deliciously crispy in the oven.  try them out with any excess veggies you might have from your CSA box this week, or go to your local farmers market, grab your ingredients, and get into your kitchen!

beet & carrot chips with sage crisps

2 large beets

2 large carrots

10 medium-large sage leaves + 2 sage sprigs

2 cloves garlic, skin on

extra virgin olive oil

2 teaspoons salt


Preheat oven to 375 and thoroughly oil a baking sheet – make sure it’s completely oiled or the beets & carrots will stick.  Bring a medium pot of water to boil.

Peel beets and carrots – careful, beets will stain!  Slice beets width-wise and carrots length wise into ¼” slices.  If carrots are long, you can slice them in half lengthwise as well.

Chiffonade sage, meaning slice sage lengthwise into very thin strips.

Once water is boiling, par-boil the veggies for 3 minutes.  Remove from water and toss in enough olive oil to coat them thoroughly.  Add salt & sage and mix well.  Lay out on the baking sheet in one row, making sure not to overlap the veggies or they will cook unevenly.  Lay out sage sprigs & garlic cloves over them. 

Cook for 25-30 minutes, flipping once midway through.  Allow to cool on a cooling rack.  If desired, add more salt to taste once they’re out of the oven.

Sunday, October 19, 2008

Sweet Alternatives: Salad Dressing & Sweetened Nuts


For anyone looking to healthify their life, there is one essential change which must be made: eliminate white sugar from your diet…altogether.  This can be hard, because white sugar is hidden in sweet and savory foods alike, often so much so that it is one of the first ingredients. 

White sugar (and brown sugar too, since it’s almost just as processed) is truly detrimental to your health. While naturally found sugar contains many healthful vitamins & minerals, the refining & bleaching process in sugar strips them all away.  However, your body needs them to metabolize the sugar, so it ends up stealing minerals from other parts in the body, like your bones & teeth.  When they say sugar rots your teeth, they mean it.

White sugar is also highly concentrated, which causes a peak & drop in blood sugar.  As you consume sugar your body begins to break it down and it gets in your blood stream – but you can only metabolize so much of it at a time.  When you’ve metabolized as much as you can, your blood sugar plummets, and whatever hasn’t been metabolized gets stored as fat.

Not scared yet?  White sugar interferes can increase the risk of coronary heart disease, suppresses the immune system, can contribute to eczema in kids, can affect the body’s mineral balance, promotes weight gain & obesity….I could go on and on and on. 

Why not try sweeten up a different way?  The two alternatives I use the most (besides raw honey & pure maple syrup, which I use as well) are sucanat and agave.  Sucanat (also called Rapadura) is like an unrefined brown sugar, and has 80% sucrose as compared to the 99.9% sucrose in white sugar.  Sucanat has a slighty earthier taste and does not dissolve as well, but I use it as a substitute in everything from coffee to chocolate chip cookies.  Another great alternative sweetener is agave nectar, which is concentrated cactus juice.  Agave has a low glycemic index and therefore hits the blood stream slower than other sweeteners, so the pancreas reacts with less panic.  It has a very sweet but neutral flavor, so you can add just a bit of it to whatever you’re making and it won’t alter the flavor profile. 

Below are two simple recipes which use agave as the sweetener – a Sweet Green Dressing & Agave Sweetened Nuts.  Get some fresh greens from your local farmers market and enjoy a sweet & healthy salad sprinkled with sweet-savory nuts & homemade dressing!  Your body will thank you for setting aside the white sugar.


Sweet Green Dressing

yields ¾ cup


3 teaspoons chopped mint

2 teaspoons chopped parsley

¼ cup extra virgin olive oil

1 tablespoon champagne vinegar

1 tablespoon agave

¼ cup water

½ teaspoon lemon juice

½ teaspoon salt

Add all ingredients to a blender or immersion blender.  Mix well, until smooth and creamy, adding more water if necessary.  Store in fridge for up to a week.


Agave Sweetened Nuts

1 cup roasted, unsalted nuts – pistachios or cashews work well

1 ½ teaspoon agave

½ teaspoon salt

pinch cayenne


Preheat oven to 375. 

Roughly chop nuts and mix well with remaining ingredients.  Spread out on a pan and bake for 5 minutes, stirring once so as not to burn.

Remove from oven and let cool 5 minutes in the pan, allowing nuts to harden as they cool.  Sprinkle over salad or yogurt, or eat plain as a snack.


Sunday, October 5, 2008

Curried Squash Soup with Apples (& Veggie Stock!)


Fall has officially arrived!!  For me that means lots of warm soups and filling the house with baby pumpkins and dried Indian corn. 

Last week while celebrating Rosh Hashanah (the Jewish New Year) at my parents house in Michigan, I got to cook with some farm fresh autumnal ingredients, straight out of their CSA box and my mom’s garden.   Being the beginning of fall, there was a ton of squash and also some carrots, so we decided to make a creamed squash soup.  Because it’s traditional to eat apples and honey in honor of a sweet new year, we kicked up this recipe a bit by adding apples to the soup itself, and also using them for the garnish. 

Winter squash, like the ones I used in this recipe, are great to eat as the weather cools down because of their warming qualities.  They’re said to be medicinal for stomach problems and helpful in improving energy circulation.  Winter squash and carrots are some of the vegetables highest in carotenoids, the fat-soluble pigments found in many red, orange and yellow foods.  Carotenoids are a great source of vitamin A and they act as natural anticarcinogenics & antioxidants (meaning they help fight off harmful free radicals in the body and protect cells and tissues).

Below are two recipes – one for the carrot & squash apple curry soup, and another for a plain veggie stock.  To those who are celebrating Rosh Hashana, have a happy & sweet new year!


Curried Squash Soup with Apples

serves 10-12 people


4 small carrots

2 butternut squash (save the seeds for roasting!)

1 delicata squash

1 teaspoon turmeric

½ teaspoon cumin

½ teaspoon coriander

1 teaspoon curry powder

1 small onion

3 cloves garlic, minced

1 small potato, medium dice

1 cup finely diced apple

1 tablespoon + 1 tablespoon extra virgin olive oil

2 tablespoons ginger juice, or more to taste

7 cups vegetable stock (recipe below)

2 teaspoons sea salt or more to taste


1 honeycrisp apple, for garnish


1.  Preheat oven to 400.  Rough chop carrots & squash (removing squash skin), and toss with 1 tablespoon olive oil, ¼ teaspoon turmeric, ¼ teaspoon cumin and ¼ teaspoon coriander.  Spread squash & carrots on a baking sheet and roast for 30 minutes or until gently browned. 

2.  In a large saucepan, add remaining olive oil and turn heat to medium.  When oil is hot, add onions and sauté for 5 minutes, adding garlic midway through & stirring frequently so as not to brown.  Add roasted veggies, potatoes, apples, stock and remaining spices, and bring to a boil.

3.  Turn heat down to a simmer and cook partially covered for 45 minutes, stirring occasionally, until all veggies are soft.   Set aside a cup or two of the cooking liquid.  Using a blender or immersion blender (I like to wait for the soup to cool a bit if using a regular blender), completely blend the soup until thick and creamy.  At this point, feel free to add back the reserved cooking liquid, as well as any extra stock as needed for desired consistency.  (The soup should be thick enough that it coats the back of the spoon when lifted up, but should pour smoothly from the spoon, not in chunks.)

4.  Once thoroughly blended, place soup back on low heat.  Grate a piece of ginger about 2” long, gathering all of the liquid and pulp that is released.  Squeeze the pulp over the soup until you have released all of the ginger juice.  Continue as needed to taste.  If you want a stronger apple flavor you can do the same with an apple. Add salt and stir well.  

5.  If you have time, let the soup sit off the heat for 2 hours or so to allow flavors to strengthen.

5.  Slice apple into ¼” rounds and cut into small dices.  These are only for garnish so it’s most important that the sizes are consistent.  Place about a tablespoon of apple dices in the center of each bowl of soup.


*            *            *


Veggie Stock

yields 5 quarts


1 tablespoon olive oil + 1 tablsepoon olive oil

2 pieces parsnip with leaves

1 potato

1 leek

3 carrots

2 pieces celery

½ large onion

3 cloves garlic

celery leaves


1.  Preheat oven to 400.  Rough chop all veggies except onion & garlic into approximately 1” pieces.  Toss in olive oil and roast for 30 minutes.

2.  Cut onion into medium dice, peel garlic & chop in half.  Heat a large saucepan on medium, adding remaining 1 tablespoon olive oil.  Add onions and garlic, stir frequently so as not to brown.  Add vegetables and 5 quarts of water.  Bring to a boil, turn heat down and simmer for 45 minutes to an hour.

3.  Strain stock completely, squeezing veggies tightly to extract as much liquid as possible.  Add salt to taste, if desired.  Discard veggies.  Stock will hold 4-5 days in the fridge, or can be kept frozen for several months.


Tuesday, September 23, 2008

feast in the field & a fall borscht


this past weekend my fiancée Rachael & I were lucky enough to get out of the city and up to Connecticut, where the leaves are beginning to change and the air is cooling down for fall.  the occasion was a Feast in the Field at the Isabella Freedman Jewish Retreat Center.  we came to know Freedman through my brother Josh, who participated in their farming internship a few years back.  in addition to the farms, they also run a huge pickling center and offer several Jewish workshops and retreats. 

before brunch, we walked around the field and surveyed all of the beautiful produce: kale, brussel sprouts, scallions, cabbage, various types of beets & carrots among others.  a large tent was set up in the middle of the field, with wildflowers as centerpieces and jars of their homemade pickles on every table.  appetizers were passed around - bruschettas with homemade goat cheese, homemade oven-dried tomatoes, eggplant caponata, and roasted peppers.  we ate our brunch – all of the ingredients grown in the very field we sat in – surrounded by green and mountains hovering in the distance. 

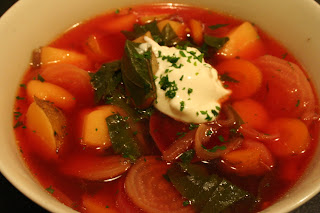
after we were lucky to pick a few beets and carrots from the nearby rows, and Freedman garlic which was put out in heaps for guests to take home.  when we came home I put our ingredients to good use by making a tasty fall borscht.  as usual the recipes here are merely guides – feel free to change it up a bit, to add ingredients as you see fit, or even to blend up the soup a bit if you like it a bit thicker.  but more importantly, enjoy!  and remember to support your local farms! 


Fall Borscht

2 teaspoons extra virgin olive oil

½ medium onion

2 cloves garlic, minced

4 medium beets, greens reserved

3 medium carrots

4 small potatoes

1 teaspoon sea salt, or more to taste

½ teaspoon paprika

¾ teaspoon cumin

a pinch of cayenne

2 bay leaves

pepper to taste

1 teaspoon minced fresh parsley

¼ teaspoon minced fresh thyme

sour cream

1.  Thinly slice onion with the grain.  Peel beets, and slice the beets & carrots in thin rounds, and potatoes into chunks.  Set aside.  Wash beet greens well, remove stems and roughly chop.

2.  Heat large saucepan on medium-low and add olive oil.  Add onions and garlic and sauté until onions are translucent, stirring frequently. 

3.  Add beets and carrots, and water to cover 1-2 inches.  Add all dry spices and bring to a boil.  Allow to simmer for half hour or until veggies are soft.  In the last 5 minutes add beet greens.

4.  Stir in parsley and thyme (reserving some parsley for plating if desired) and remove from heat.  Serve with a dollop of sour cream and a sprinkle of parsley.  Enjoy!

*Borscht is delicious both warm or at room-temp


Monday, September 15, 2008

hello everyone!  it’s been quite some time since I’ve written, but I’m back and ready to share more delicious, health-supportive recipes and nutritional knowledge with you. 

I recently completed my internship at Blue Hill at Stone Barns, where I worked 14 hour days and headed up the amuse bouche station, sending out tasty treats to customers before they began their meal.  it was an amazing experience and I learned a great deal about cooking and the restaurant industry.  during my last week I got to work on the farm cleaning eggs, which would then be used in the restaurant.  Stone Barns raises their own chickens (along with other animals and a massive amount of produce) so there are fresh eggs every day.  I brought several baskets of eggs into the wash room and loaded them up onto a conveyer where they were washed and sorted by size.  any broken eggs are put aside for pig feed.  the large, brown eggs were so freshly lain, some were still warm in my hand as I placed them on the conveyer belt.

eggs are one of those controversial foods that go back and forth between being labeled safe & healthy one day and horrible for you the next.  while it’s true that eggs are rich in cholesterol, studies show that they have little effect on blood cholesterol levels.  this is partly because the phospholipids (fatty substances) in the yolk interfere with absorption of  yolk cholesterol.  eggs are the most complete protein source available and contain all 8 essential amino acids.  unless you’re suffering from obesity or serious heart disease, you most likely do not have to limit egg consumption.

when purchasing eggs it’s easy to get frazzled by the many labels screaming out at you – organic, omega 3, free range, etc.  Harold McGee, in his book “On Food and Cooking”, says that “‘free-range’ can be misleading; it sometimes means only that the chickens live in a slightly larger cage than usual, or have brief access to the outdoors.”  organic eggs guarantee organic and vegetarian feed, though chickens do not naturally eat a purely vegetarian diet.  however, organic is certainly better than conventional, which is 6 times more likely to be contaminated with salmonella.  my preferred way to buy eggs is directly from a farm or farmers’ market, where you can ask the farmer how the chickens are raised.  if they’re allowed to roam freely on the grounds they tend to be higher in Omega 3 fatty acids, which our bodies need more of with today’s diet.  

check out the recipe below for a delicious quiche in an olive oil crust.  try it fresh out of the oven or cooled to room temp.  change up the filling based on whatever’s in season.


Olive Oil Crust

yields 1 (10 inch) crust

¾ cup whole wheat pastry flour

¾ cup whole wheat flour

½ teaspoon baking powder (optional)

½ teaspoon sea salt

2 teaspoons cumin seeds

½ teaspoon turmeric

½ teaspoon paprika

¼ cup olive oil

¼ - ½ cup ice cold filtered water (or less)


1.  In a medium bowl, sift together flour, salt, baking powder & spices.

2.  Add oil to flour mixture all at once but do not mix.  Toss flour around lightly with a rubber spatula.

3.  Add water one tablespoon at a time, tossing it gently into the flour mixture.  Be careful not to break up or mix together the balls of flour that form.  You have added enough water when there are no more dry crumbs at the bottom of the bowl.   *A light touch is important here.  The final blending will take place while rolling out the dough.

4.  Flatten dough into disk shape in plastic wrap and chill 15 minutes.

5.Place dough between 2 sheets of parchment paper (this is not necessary but can be helpful). Lightly flour both sides of the dough and roll to desired shape.  Place in pie or tart pan and chill for 15 minutes more. 

6.  Heat oven to 375 degrees.  Pierce dough several times with a fork and blind bake for 10 minutes to ensure the dough will not get soggy when filling is added.  Remove from oven and add filling.

Easy food processor instructions: 

Add dry ingredients and mix together.  Drizzle in olive oil & pulse.  Add water one tablespoon at a time until incorporated.  You’ve added enough when the mixture whips quickly around the food processor in one large mass. 

*            *            *

Seasonal Quiche

yields 1 10-inch pie


1 10-inch pie crust

2 teaspoons extra virgin olive oil

1 cup thinly sliced onion

1 cup broccoli florets & stems

½ cup sundried tomatoes, chopped

1 tablespoon minced parsley

pinch of thyme

1 ½ cups packed grated cheese (Fontina works well)

5 large eggs

1 ½ cups milk

2 tablespoons whole wheat flour

1 teaspoon salt

pepper to taste

paprika


1.  Preheat oven to 375. 

2.  Cut broccoli into florets then peel the stem & slice into thin rounds.  In medium sauté pan, heat olive oil and add onions.  Sauté until translucent and add broccoli; sauté about 5 minutes until cooked through and bright green.

3.  In medium bowl, combine eggs, milk, flour, salt & pepper and beat well.  Add sundried tomatoes, parsley & thyme and mix well. 

4.  Spread grated cheese over the bottom of the crust and spread broccoli & onion mixture on top.  Pour in the egg mixture and sprinkle the top with paprika.

 5.  Bake 35-45 minutes, or until solid in the center.  Serve warm or at room temp & enjoy!